Spring is a beautiful season full of fresh, blossoming trees and new life. With this beauty comes allergies and post-winter colds. Instead of heading towards the medicine cabinet, try reaching for fresh foods that are full of beneficial nutrients to help get you through this spring season.
Nutrient-rich and easy-to-eat, try these top seven seasonal wellness foods:
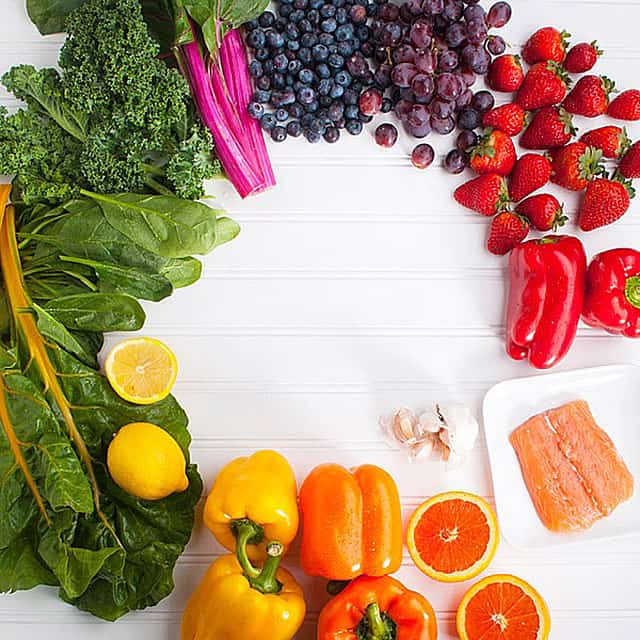
Salmon
High in protein and rich in omega-3 fatty acids, salmon offers a nutrient-rich dish that tastes great broiled, baked or grilled.
Peppers
Packed with B vitamins, vitamin C and immune-boosting carotenoids, peppers give your plate a punch of color. Plus, they’re packed with antioxidants and have anti-inflammatory benefits!
Citrus
Whether you prefer lemons, limes, oranges or grapefruits, citrus is a tasty way to load up on vitamin C. Citrus varietals also contain hesperidin, which may help reduce inflammation and improve circulation.
Leafy Greens
Dark leafy greens such as kale, spinach and Swiss chard are powerful sources of antioxidants, flavonoids, and vitamin C,—all of which have anti-inflammatory benefits, and may help to protect against cellular damage.
Grapes
The anthocyanin in purple and red grapes is what gives them their dark rich color, but did you know, it also gives grapes the anti-inflammatory and anti-aging benefits that keep you feeling great?
Berries
These sweet treats are packed with antioxidants, vitamin C and quercetin, which have anti-inflammatory benefits and help keep your immune system strong.
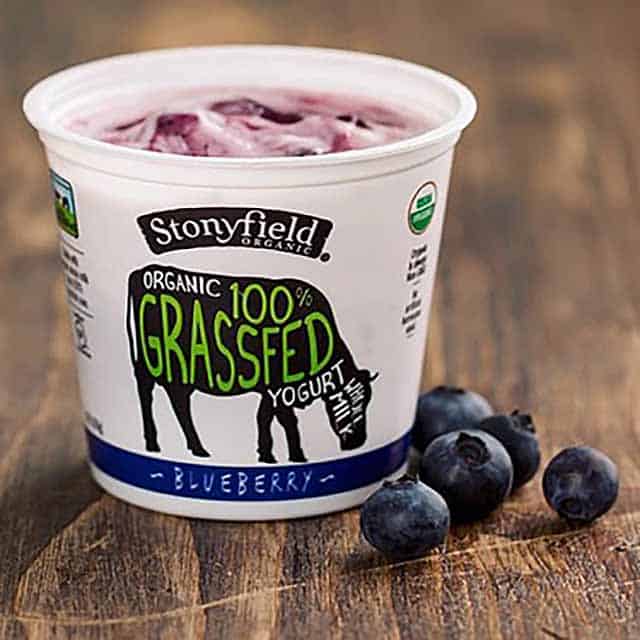 When cows are 100% grassfed, they eat all grass (no grain, no corn), all the time, all year long! Because of this, the milk has a rich, unique taste. It’s simple, and it’s simply delicious. As a matter of fact, it is certified 100% Grassfed by the PCO*.
There are four delicious flavors in the six-ounce singles. Plain and vanilla flavors are available in a convenient 24-ounce size. So whether you are snacking, cooking or adding your own fresh fruits, there is an option for you.
Stonyfield Organics takes the time to support family farms and strives to be good citizens of the planet by taking environmental concerns seriously. That’s what makes Stonyfield products more than just delicious.
*The PCO 100% Grassfed certification program establishes an optional additional certification scope for operations that are certified organic under the USDA National Organic Program regulations.
To learn more about PCO’s 100% Grassfed standards, visit www.paorganic.org/grassfed.
Learn more about them @Stonyfield on Facebook, Instagram, Twitter, and Pinterest, or visit Stonyfield.com to find out more.
When cows are 100% grassfed, they eat all grass (no grain, no corn), all the time, all year long! Because of this, the milk has a rich, unique taste. It’s simple, and it’s simply delicious. As a matter of fact, it is certified 100% Grassfed by the PCO*.
There are four delicious flavors in the six-ounce singles. Plain and vanilla flavors are available in a convenient 24-ounce size. So whether you are snacking, cooking or adding your own fresh fruits, there is an option for you.
Stonyfield Organics takes the time to support family farms and strives to be good citizens of the planet by taking environmental concerns seriously. That’s what makes Stonyfield products more than just delicious.
*The PCO 100% Grassfed certification program establishes an optional additional certification scope for operations that are certified organic under the USDA National Organic Program regulations.
To learn more about PCO’s 100% Grassfed standards, visit www.paorganic.org/grassfed.
Learn more about them @Stonyfield on Facebook, Instagram, Twitter, and Pinterest, or visit Stonyfield.com to find out more.


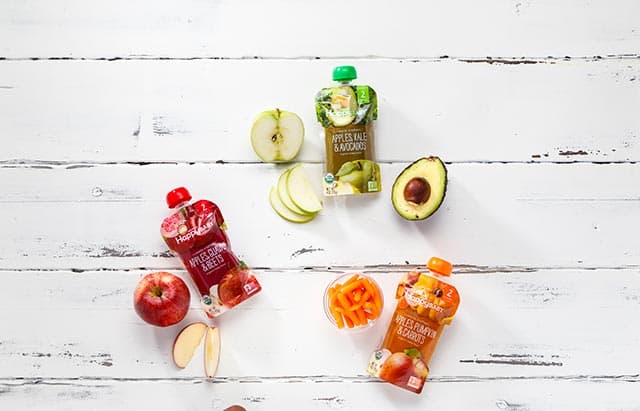 Clearly CraftedTM is Happy Family’s new line of transparent pouches with premium organic recipes for babies, featuring two Stage 1 flavors and ten Stage 2 flavors. Happy Family partnered with high-quality organic farms and suppliers that share their passion for making purposeful, nutritious foods. Each yummy recipe is made with wholesome and organic ingredients to help create vibrant flavors.
With Clearly CraftedTM, Happy Family shares the information that all moms want to know most—what’s inside. Happy Family understands the importance of being mindful when shopping for and nourishing your little ones. That’s why you’ll find the recipe on every pouch full of fruits and veggies that can be traced back to high-quality farms and suppliers. Parents can feel confident shopping for their little ones with products set out to support happy and healthy babies.
To learn more, visit
Clearly CraftedTM is Happy Family’s new line of transparent pouches with premium organic recipes for babies, featuring two Stage 1 flavors and ten Stage 2 flavors. Happy Family partnered with high-quality organic farms and suppliers that share their passion for making purposeful, nutritious foods. Each yummy recipe is made with wholesome and organic ingredients to help create vibrant flavors.
With Clearly CraftedTM, Happy Family shares the information that all moms want to know most—what’s inside. Happy Family understands the importance of being mindful when shopping for and nourishing your little ones. That’s why you’ll find the recipe on every pouch full of fruits and veggies that can be traced back to high-quality farms and suppliers. Parents can feel confident shopping for their little ones with products set out to support happy and healthy babies.
To learn more, visit  Tabañero is more than just a hot sauce—it’s a lifestyle. It’s about living with passion and fire! It’s about going from good to great, ordinary to extraordinary. The Tabañero team wanted to create a line of hot sauces for conscious consumers that were not only delicious but also packed with fresh and flavorful ingredients.
Tabañero’s unique flavor comes from the combination of carrots, onions, garlic, key-lime juice, red habañero peppers and agave nectar. The agave nectar balances out the heat of the habañeros and adds a hint of sweetness. Tabañero is not vinegar-based so you can actually cook with it and not have that pungent vinegar taste that is associated with other hot sauces.
Tabañero is all-natural, gluten-free and low in sodium. The Tabañero team has dedicated taste testers to ensure the quality and flavor always meets the standard of being “the most flavorful hot sauce in the world.”
Pick up a bottle of your healthy heat today and spread the spicy love!
Tabañero is more than just a hot sauce—it’s a lifestyle. It’s about living with passion and fire! It’s about going from good to great, ordinary to extraordinary. The Tabañero team wanted to create a line of hot sauces for conscious consumers that were not only delicious but also packed with fresh and flavorful ingredients.
Tabañero’s unique flavor comes from the combination of carrots, onions, garlic, key-lime juice, red habañero peppers and agave nectar. The agave nectar balances out the heat of the habañeros and adds a hint of sweetness. Tabañero is not vinegar-based so you can actually cook with it and not have that pungent vinegar taste that is associated with other hot sauces.
Tabañero is all-natural, gluten-free and low in sodium. The Tabañero team has dedicated taste testers to ensure the quality and flavor always meets the standard of being “the most flavorful hot sauce in the world.”
Pick up a bottle of your healthy heat today and spread the spicy love! 
 Prepping Thanksgiving dinner can be tough—especially when little ones are involved. Creating an entire Thanksgiving spread and getting your kiddos to eat this balanced meal is a feat to feel thankful for when achieved.
Luckily, we’ve got a kid-approved snack that’s easy to make and fun to eat! Kids will love that these adorable turkey cups are just for them and you’ll love knowing this snack is packed full of good-for-you ingredients.
Prepping Thanksgiving dinner can be tough—especially when little ones are involved. Creating an entire Thanksgiving spread and getting your kiddos to eat this balanced meal is a feat to feel thankful for when achieved.
Luckily, we’ve got a kid-approved snack that’s easy to make and fun to eat! Kids will love that these adorable turkey cups are just for them and you’ll love knowing this snack is packed full of good-for-you ingredients.
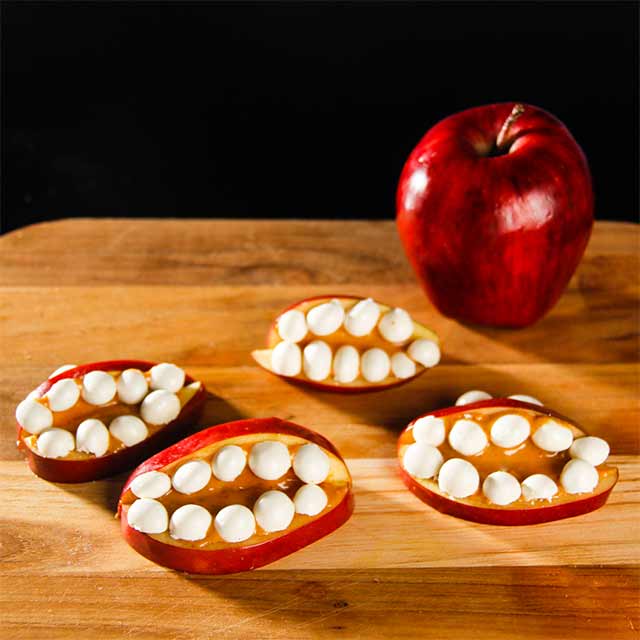 APPLE MONSTER CHOMPERS